Thursday, 7 July 2011

Class photo.

I can't believe time's gone by so fast. I just feel like should go to school next Monday. We just made two different boats but I think we have leant a lot. To me, it's really good experienced of my career. We are good taem I think. I'll miss this class. Thanks Chris and Thanks everyone ~! 

Glassing outside of the boat.

https://docs.google.com/document/d/1QFQbyxhV7-31gdc2BqULuDzlRotzG0sBQbeEmciY1iQ/edit?hl=en_US#

I made this process as a manual in goolgle docs.

Friday, 1 July 2011

attaching deck to the hull.


Before we attach deck to the hull, we fixed B/H which is stn 11 because the flange which made for this B/H would not work. Thus, we made holes on the B/H for putting some glue to attach the hull. After that, we put some glue on the flange which is on the top side and transom as well. After attach the deck to the hull, we made some piece of block to push the deck to the flange like the picture as aboved. However the problem is that the B/H which i made and cut off is not touch the side deck. I thought it's going to be down but it wasn't. Thus, I realised that i should find out how the side deck going to be done. When we turn the boat over, I found some gap and over glueing which we have to sand it off. Hence, next time we need to plane and sand to take this off as well as filll in the gap.

Saturday, 11 June 2011

flange of the girder.

First of all, we made a plate for girder.
After make the plate, we figured out how to attach it on the girder, so first, we needed some flat place for setting it up. we took some saw bench and put straight edge on. Using the masking tape to level for the girder, make sure it's straight, chek it several time it dosen't move when you're working on it. Lastly, glue and cove it.

Tuesday, 31 May 2011

flange.

Today, I asked Chris to the flange of top side that how it going to be done because I knew it but wasn't quite sure. Chris explained to me as he was sketching. I like this. First of all, we talked about the purpose of the flange. I was thinking it's supporting things when we attach something. For example, if we attach deck to hull, we need to something hold it otherwise it might fall down or crush, so we made temporary flanges and then we are going to cove it underneath as well as glss laminate. We also talked about problem solving. Chris told me that it is typical teaching style of kiwi. When they working on something, they always try to think and challenge for solving problems themselves. However it is unsual to me because we were educated follow teacher. They nomally tell us what to do something and we don't have many question and challenge during the class. Anyway I realised that this way improve our problem-solving as well as creativity.
In addition, we don't forget the knowledge well and to be able to keep that memory for a long time.

Monday, 30 May 2011

deck


Before the deck vacuum, we need to make the rebates so we figured out how many and where is going to be then make a sanding block to sand foam down. Why we make the rebate is that if we glass on it the two glass which is atf and foward going to be overlaped so make it fair surface. After that, we started vacuuming with we prepared for that. When you put resins on the glass and peel play, you make sure that air free.

Vacuuming floor - you can see the nice cove of this picture, after cove the floor, we prepared to vacuum the floors. It's same way when we was vacumming the other thing exept the uni carbon. The stack is that uni carbon - glass lami - peel ply - perf plastic - mash - vacuum bag. You need to make the vacuum bag being wide enough. Otherwise you cannot have enough room for wrinkle. 

Tuesday, 12 April 2011

Chris n student's - boat building

What is the purpose of the peel ply?

chris asked me to blog on that topic. we nomally use the peel ply when glassing so i have been thinking about the reasons. First of all, we will be less sading after peel it off unless there is peel ply wrinkle. The other reason why we use the peel ply is that it's holding the shape of the hull because once it's laminating, it would be very tight. Third, it will protect laminted parts from dirt,dusty and any other things because they might be exposed many days, also there are red lines so we can see that it's peel ply which means we can look after laminated parts.

Monday, 11 April 2011

Before we vacuum the girder, we made a list what we going to need then we can work step by step. It is called stack
film - perf plastic - peelply - glass - foam - glass - peelply - perf plastic - mash - plasitic bag

V11 04 11 13 44

V11 04 11 14 09

Thursday, 7 April 2011


we talked about how we going to hold the topside foam after take off the nails so some people came up an idea then chris wrote on the cardboard. Chris explained about make some block to screw on the frame. As you can see the sketching how it going to be done

V06 04 11 14 54

V06 04 11 14 45

Tuesday, 5 April 2011

Girder

Kenny and I made the girder. Before we make it, we asked to Chris how it is going to be done. First of all, we discussed that what is the purpose of the girder so we answered that question.

- support to the cockpit sore
- firm / strong 
- streight / stiffness
- balancing

Chris also explained that he went up the middle of cardboard which two saw bench were holding each ends. The weight prssure the middle bending the cardboard so we need something support it. That is why we make the girder.

How to make the girder.
First of all, we need loafting this so we got all measurements from the Autocad then we figured out the thickness of planking as well as cockpit sore. After lifting off on the foam, we prepared to vacuum it.


The last work of the hull. Fill in the gap and sand it before the glass on.

Monday, 4 April 2011


This is the process which is setting up the deck frame. It is the same way when we set up the frame.
 we should remember that the centerline must line up. we need to keep the frames plumb. This is done with a level. Each frame is numbered and the location of this must match the grid.
tired couple
This is the picture which we were gluing all the planking. Before we take those planking out, we should mark something like letter or number on the planking we can know which one was it. Then some people glue the planking and others put these planking back. After that we make sure take glue off which is squeeze on the planking.
<After work>

After dry the glue, we started sanding to make sure it fair and take glue mark off. You must need the glasses, earmark and mask because there are lots of dusty when you are sanding. It takes 2~3days because it will take whole day for sanding and then you glue into the nail hole as well as gap and then the other day we are sanding again. One tip is that if you make own sanding block which make it comportable for using yourself, it will be much easier and quicker.

This is the picture finished the sanding. It looks more clean, smooth and fair.

Saturday, 19 March 2011


On wednesday, we talked about how to set up the striped plank and we devide by two teams. One team worked outside planking, the other team worked inside. However the mashines had fixed for 3or4 days so we weren't able to use the speed sanding which make it 8mm. That is why we just set up only inside. james and chris cut and beveled, the others glued these planking and then it was holding by nails.


Acorrding to the machines had fixed, we made a decision to build the top side first so we discussed that top side, how we going to build, which part it is and how it looks like. First of all we imagined that how transom looks like. As we can see the body plan of the transom, we noticed that it has a centre case, side deck, cockpit and girders. We also talked with Rob who is a designer this boat about how we're going to build a deck something like that. Afterthat we had to think about how we're going to build forward and aft together. Everyone thougt about it and sketched it. Anyway we made a decision to build it beside of the boat to set up the frame so we have to figure out that how we're going to sep up these as well as how we going to build the other things.

chine


planking ....thickness has to be 8mm.


The chine need to be beveled so 3or4 people were holding the chine to the clamping for measuring the gap between frame and plank and then draw the line on the planking we can bevel.  


Ater draw the line, we started to bevel the planking. The most important thing is that make sure the fair because when we plane, we somtime make a miatake some part is fair other part isn't so we did plane carefully and went straight way. The FP should be very sharp. we also make some block which is beveled because some frame which is foward doesnt fit on the waterline which means, we need to twist the striped planking and then screw on the block to make sure its fit on the waterline.


we set up the chine and did glue striped planking. The foward was clamping to doesn't move. However the problem part was that chine because chris suggested that forward of chine should be laminated but no one remeber that way and chris didn't happy with it so we took it out for laminating. Some reason why we laminate the chine is that it will be easier to twist. As you can see that picture, we cut it divided by three piece so it's getting flexible. The other reason is that it will be more strong. This is one of the function of the epoxy. After glue these, taping each foward dosen't move. 


Thursday, 17 March 2011

setting up

Before the frame legs set up, you should make sure clean the floor and  you draw the base line to use the trammel arm. It will be easier to make a right angle. Afterthat draw the all lines follow the Auto Cad plan as well as set up the frames. All the frames has to be level and fair so when you set up these, you just chek each side of the frame by dumpy which means, clamping storyrod each side of the frame and then someone looking the storyrod by dumpy to make sure the both storyrod lines exactly same. If you think the both line definately right, you should tell to others then they screw the frame and glue the wedge. This way is going to be continue to last station.

Tuesday, 15 March 2011

build a new boat.

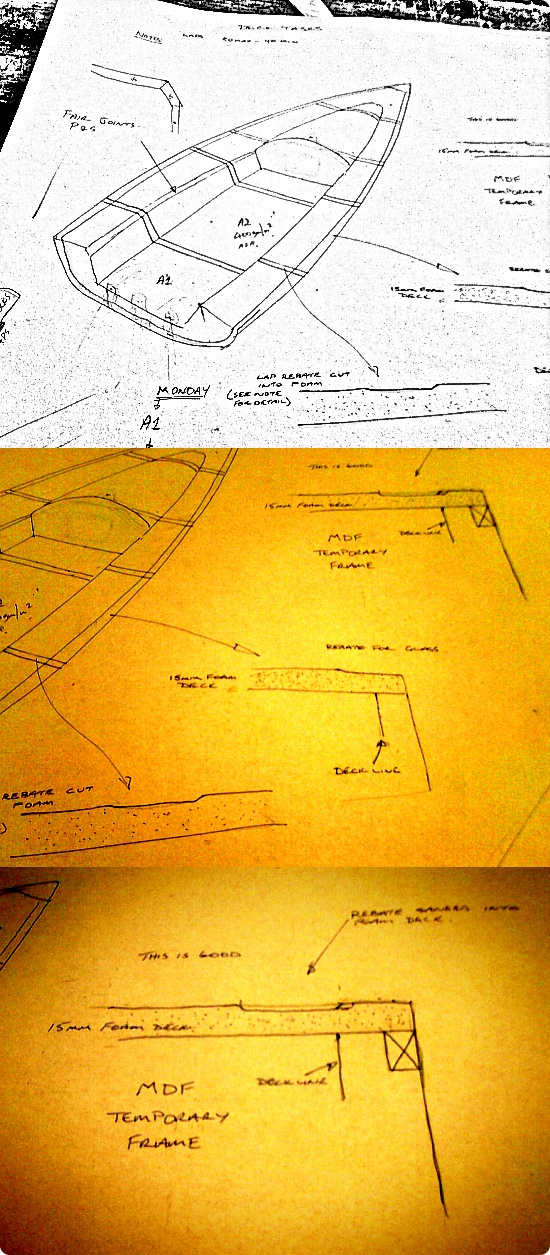
we started build a new boat which is rob's designed. This boat is a sailing boat so it's totally different dory which we built the last project. I think everyone looking forward to it.
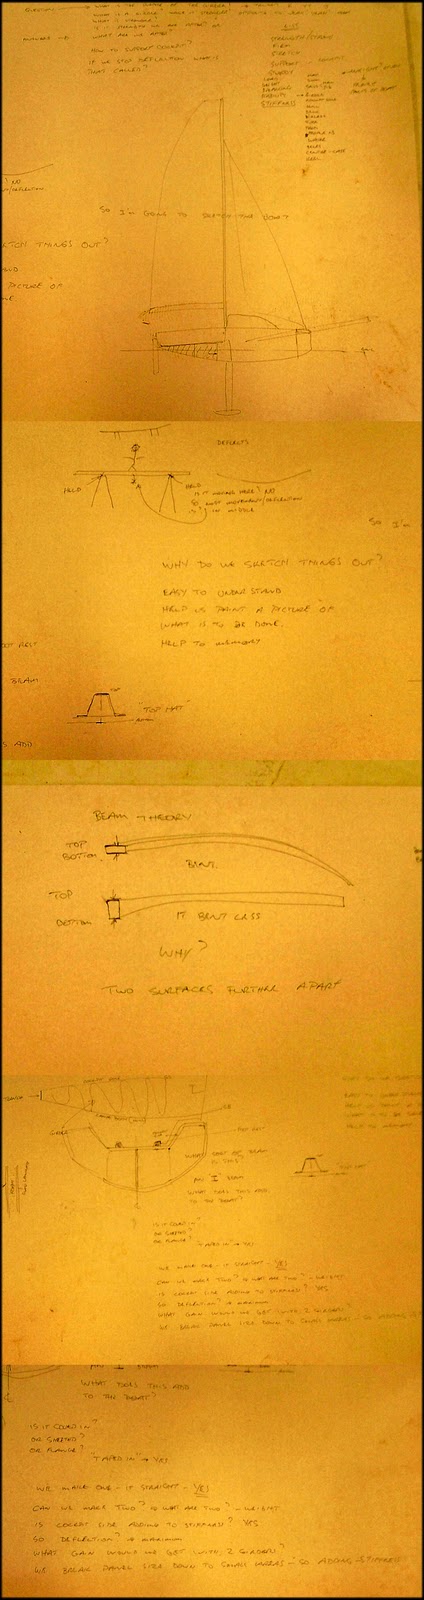
This picture is the theory what we are going to build a boat. This time we are not going to seperate each team, we are going to work just one team, so everyone has a charge each task like setting up, strip planking transom, foam, c/case etc. we also support each other doesn't meaning change work as a team.
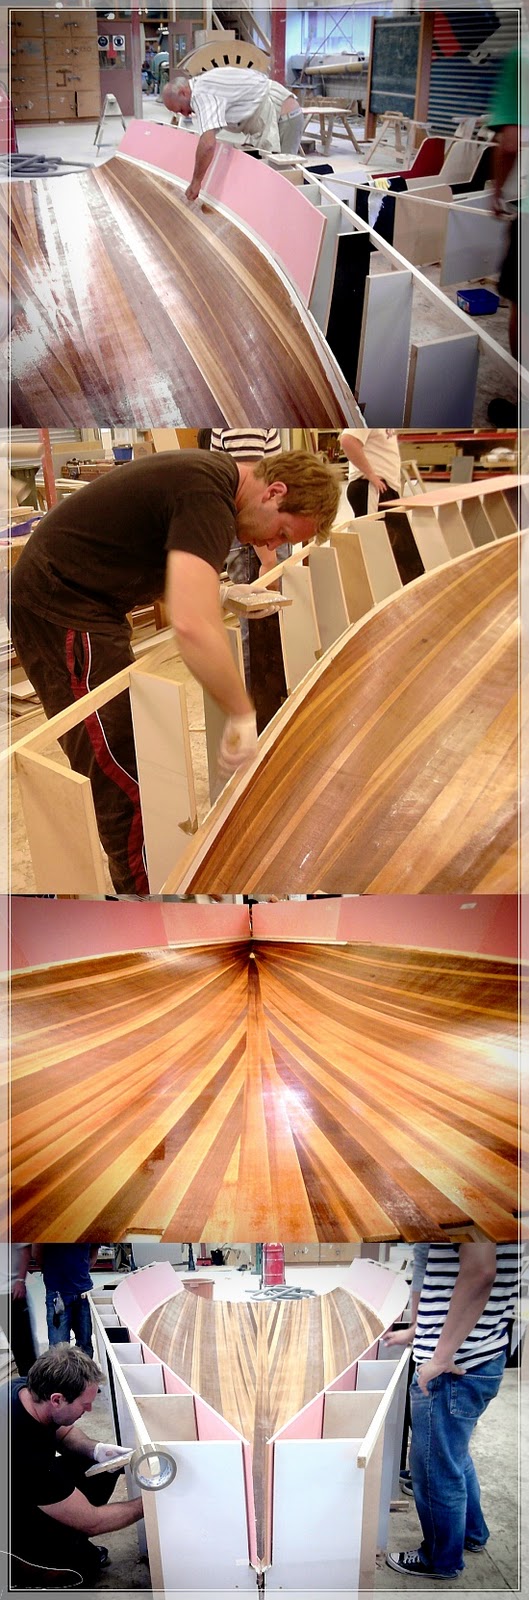
1) setting up.

This is the frame all we need, those frame seprated each side so we needed to make some gussets which are connecting each frame side. The gusset length was 500mm but all heights were diffrent so we measured all heights of the frame. Before we connect each side of frame, we did a little bit sanding for making rough because we was going to glue on it. Actually we tried that way but failed. Because the frame had a gap, which means didn't fit right way so we tried to frame jig set up again
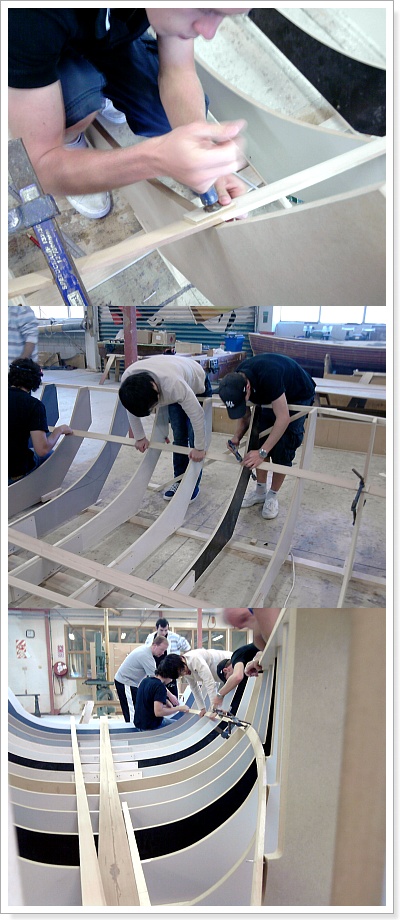
when we were the frame jig setting up again, we figured out Pythagoras theorem because if that measurment is right, it will be exeactly perpendicular. After that, make sure the frame has no gap and two people step on the each side of frame to doesn't move and then use a role to make some place between gusset and top side of frame, when we make sure all those things, then drilled and screw on it. when you finished the screw, you just a little bit unscrew and screw it again. This way can be make it much stronger rather than just screw.
                                                               < Pythagoras theorem >